How to compress images without losing quality
Updated 2026 · ~5 min read · by kizura
Large image files slow down websites, eat up storage, and are awkward to share. Compression solves this by reducing file size — but done carelessly it leaves photos blurry and blocky. This guide explains how to shrink images while keeping them looking clean.
Lossy vs lossless compression
There are two broad approaches. Lossless compression (used by PNG) reduces size without throwing away any image data, so quality is perfectly preserved — but the savings are modest. Lossy compression (used by JPG and WEBP) discards information the human eye is least likely to notice, achieving far smaller files at the cost of some detail.
For most photographs, well-tuned lossy compression is invisible to the eye while cutting file size by 70% or more. The trick is choosing the right quality level.
Choosing a quality level
Quality is usually expressed as a percentage. As a rule of thumb: 90–100% is near-indistinguishable from the original and best for important photos; 70–85% is the sweet spot for web images, balancing size and clarity; below 60% you start to see visible artifacts around edges and in flat areas. Our compressor shows the resulting file size live as you drag the slider, so you can find the lowest setting that still looks good.
Which format compresses best?
- WEBP usually produces the smallest files at a given quality and is supported by all modern browsers — the best default for the web.
- JPG is universal and great for photographs, though slightly larger than WEBP.
- PNG is lossless and the right choice for logos, screenshots, text, or anything needing transparency, but produces much larger photo files.
Tips for the best results
- Always compress from the original, highest-quality file — re-compressing an already compressed image stacks artifacts.
- Resize before compressing: if an image will display at 800px wide, shrink it first with the resize tool, then compress.
- Use WEBP for the web, JPG when you need maximum compatibility.
- Check fine detail and faces after compressing — they show artifacts first.
Quick answers
Does compressing reduce image dimensions?
No. Compression reduces file size in bytes, not the pixel dimensions. To change dimensions, use a resize tool.
Is the process private?
Yes — our compressor runs entirely in your browser, so images are never uploaded.
Ready to try it? Open the image compressor. Need a specific target size? Try compressing to 100KB or 20KB.
What compression actually saves: our measured results
Abstract percentages are easy to claim, so we measured. We took a 600×466 high-detail autumn-forest photo — dense foliage is close to a worst case for compression because almost every pixel differs from its neighbours — and exported it at each quality level with the same encoder ImgScale uses in your browser.
| Export setting | File size | vs JPG q85 |
|---|---|---|
| JPG quality 95 | 197.8 KB | +59% |
| JPG quality 85 | 124.7 KB | baseline |
| JPG quality 75 | 104.6 KB | −16% |
| JPG quality 60 | 66.9 KB | −46% |
| JPG quality 40 | 56.7 KB | −55% |
| WebP quality 80 | 106.5 KB | −15% |
| WebP quality 65 | 83.9 KB | −33% |
| PNG (lossless) | 650.8 KB | +422% |
Measured on a 600×466 foliage photo. Your numbers will vary with content, but the shape of the curve holds.
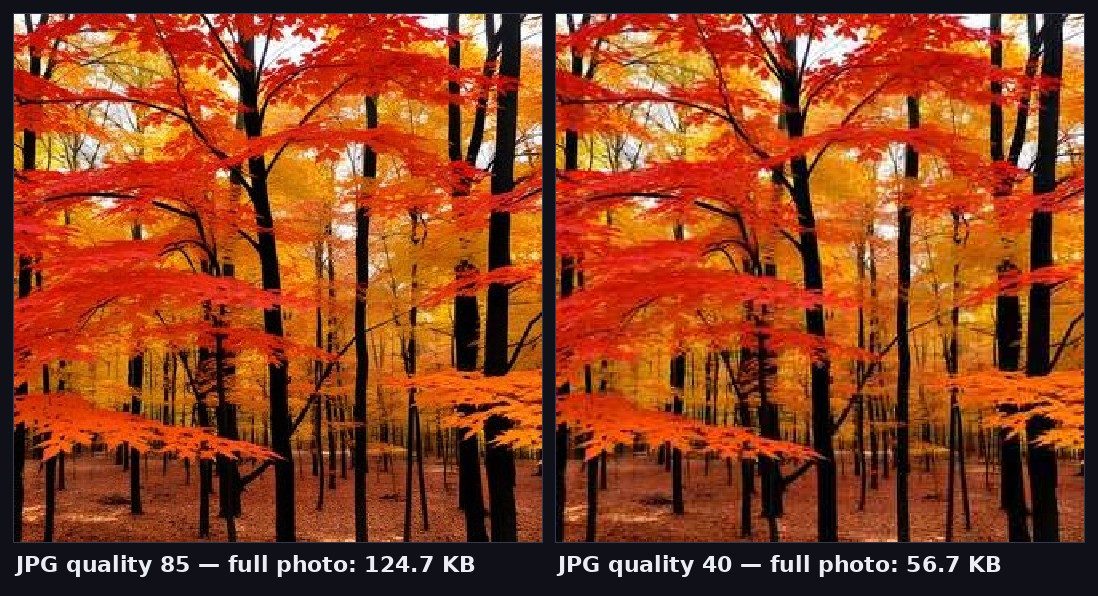
Three practical lessons fall out of this table. First, the jump from quality 95 to 85 saves more than a third of the file while being nearly invisible on a photo — q95 is almost never worth it outside print work. Second, savings flatten out fast below quality 60: dropping from 60 to 40 only shaved another 10 KB here while artifacts became obvious, so starving quality past the knee of the curve buys little. Third, saving a photograph as PNG cost five times the bytes of a visually identical JPG — PNG is the right tool for graphics, not photos.
A quality cheat sheet by destination
- Print or archiving: JPG 90–95, or keep the original. Storage is cheap; regret is not.
- Website hero / portfolio: JPG 80–85 or WebP 75–82. Sharp on a retina screen, reasonable weight.
- Blog body images, listings: JPG 70–78. On an image displayed at 800 px wide nobody will spot the difference.
- Chat, email, quick shares: JPG 60–70. The recipient sees it on a phone for four seconds.
- Thumbnails: quality matters less than dimensions — resize first, then compress; a 200 px thumbnail at q80 is tiny anyway.
One habit worth building: compress from the original every time rather than re-compressing an already-compressed file. We re-encoded the same JPG five times at quality 80 and the file size barely moved (115.2 KB → 114.5 KB), which sounds harmless — but each generation quietly stacks new block artifacts on top of the old ones. The size stays flat while the picture degrades, so the file gives you no warning.
When you should not compress
Lossy compression is a one-way door. Skip it for master copies of family photos, anything headed to a print lab, images you will edit again later (edit first, compress last, once), medical or documentation imagery where fine detail is evidence, and screenshots containing small text — text edges are exactly what JPG mangles first, so use PNG or lossless WebP for those instead. If a file is too big but you cannot afford quality loss, reduce its pixel dimensions with the resize tool instead: fewer pixels is a cleaner trade than harsher compression, and our file-size guide shows the measured difference between the two levers.